Thursday, April 19, 2007

Testing Eclipse plug-ins

When you write Eclipse plug-ins sooner or later you will start thinking about testing your work. The very first steps will lead you to the Internet. But to my (and maybe your ;) ) surprise this information is not very easy to find. I know two ways to accomplish this task and I want to describe the first one – testing Eclipse plug-ins using build-in JUnit support.

Lets imagine that we have plug-ins that provides a projects view (very useful example ;) ).
When you start with empty workspace it should show nothing, in other case it should show projects names from your workspace.

The first think which springs to your mind is to build simple JUnit test and run it.

This is an option when you are trying to test functionality which is not dependent on Eclipse API.

So to test this functionality following steps are needed:
  • build test plug-in
  • implement tests
  • create launch configuration
  • run tests

Whole procedure is not very big deal. The first thing you'll need is new plug-in. I assume that you can do it (you've just implement plug-in you want to test).

Now you need to add JUnit plug-in to your dependencies (In my case it will be JUnit 4)

We also need dependency to our tested plug-in.

There are also two others plug-ins needed so our dependencies list can be seen in the picture .


Another thing to do is to create Junit test case. While we use JUnit 4 it can be simple class (there is no need to extend TestCase class).

All we need at this level is to build empty test method to check if we are able to run our test. The code looks this way:


package org.test.views;

import static org.junit.Assert.*;

import org.junit.Test;

public class SimpleTest {

@Test
public void simpleTestMethod() {
fail("implement this method");
}

}


Now is the moment to create run configuration. From Run menu we choose in case of Eclipse >= 3.3M5 Open run dialog... (in older versions Run...). Next we create new configuration in "JUnit Plugin test".


The difference from normal plug-in is that we have another tab called Test. On this tab we are able to specify version of JUnit and how we are going to use our test (as a single test or as a group of test from specific location).

Other tabs are also available in normal plug-in configuration so I believe you will manage to config it by yourself ;).

Now you should be able to run your test. Enjoy ;)

If you are looking for inspiration you should look into Eclipse CVS. There is thousands of test in each Eclipse project from witch you can learn.

Source code for this short tutorial can be found here.
Thursday, April 5, 2007

Mylar update site

New Eclipse milestone were released M6 and we got it the same day ;) I personally am very keen of Mylar. But to my surprise it stopped working. So to make it short: version from update site doesn't work with Eclipse 3.3M6. To get working one please use http://download.eclipse.org/technology/mylar/update-site/e3.3 as your update site.

Wednesday, April 4, 2007

How to add Zoom facility to the GEF editor?


Often on the GEF newsgroup there can be found questions concerning zooming in the GEF editor. I tried to investigate this subject and found out that adding basic zooming operations isn't to complicated. All required code I found in the Logic GEF example project: org.eclipse.gef.examples.logic project, which can be checkout from the CVS (if you don't know how to access Eclipse CVS check this page: WIKI CVS HowTo).
To demonstrate the solution I will use another GEF example, but this time it will be Shape Editor project: org.eclipse.gef.examples.shapes, which also can be checkout form the CVS. Shape Editor is very simple GEF editor, which allows you only to add two figures and connect them with two connection types. We will want to add the zooming facility to this poor functionality.

Zoom actions can be added in two ways:

  • by the toolbar
  • by the menu
To add zooming action to the toolbar we need to:
  • In the class
    org.eclipse.gef.examples.shapes.ShapesEditorActionBarContributor you need to overwrite method
    EditorActionBarContributor#contributeToToolBar
    and add this code:

    String[] zoomStrings = new String[] {
    ZoomManager.FIT_ALL,
    ZoomManager.FIT_HEIGHT,
    ZoomManager.FIT_WIDTH

    };

    toolBarManager.add(newZoomComboContributionItem(getPage(), zoomStrings));


  • in the class org.eclipse.gef.examples.shapes.ShapesEditor
    in the method configureGraphicalViewer
    you need to add such code:
    List zoomLevels = new ArrayList(3);
    zoomLevels.add(ZoomManager.FIT_ALL);
    zoomLevels.add(ZoomManager.FIT_WIDTH);

    zoomLevels.add(ZoomManager.FIT_HEIGHT);

    root.getZoomManager().setZoomLevelContributions(zoomLevels);
Where root is an instance of ScalableFreeformRootEditPart which you should pass as a parameter to: viewer.setRootEditPart(root); These string values - ZoomManager.FIT_ALL, ZoomManager.FIT_WIDTH and ZoomManager.FIT_HEIGHT are the additional zoom levels added to the zoom combobox.
  • in the class org.eclipse.gef.examples.shapes.ShapesEditor
    in the method getAdapter
    you need to add such code:
    if (type == ZoomManager.class) {
    return getGraphicalViewer().getProperty(ZoomManager.class.toString());
    }
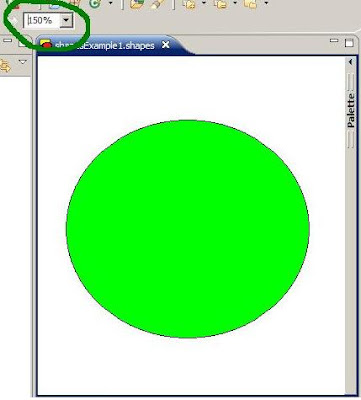
And that's all! You should see similar effect to this one in the picture below:


Now let's see what are we suppose to do to add the zooming to the main Eclipse menu

  • in the class org.eclipse.gef.examples.shapes.ShapesEditor in the method configureGraphicalViewer you need to add such code:

  • IAction zoomIn = new ZoomInAction(root.getZoomManager());
    IAction zoomOut = new
    ZoomOutAction(root.getZoomManager())
    getActionRegistry().registerAction(zoomIn);
    getActionRegistry().registerAction(zoomOut);

    and additionaly if you want to have the keyboard shortcuts you have to add:
    getSite().getKeyBindingService().registerAction(zoomIn);
    getSite().getKeyBindingService().registerAction(zoomOut);
  • in the class org.eclipse.gef.examples.shapes.ShapesEditorActionBarContributoryou need to overwrite method
    EditorActionBarContributor#contributeToMenu(IMenuManager)and add there:
    super.contributeToMenu(menubar);
    MenuManager viewMenu = newMenuManager("ZOOM");
    viewMenu.add(getAction(GEFActionConstants.ZOOM_IN));
    viewMenu.add(getAction(GEFActionConstants.ZOOM_OUT));
    menubar.insertAfter(IWorkbenchActionConstants.M_EDIT,viewMenu); //where the menu should placed on the menu bar

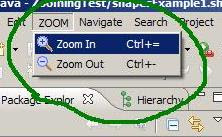
The effect you can see below: